1. Open MainActivity.java
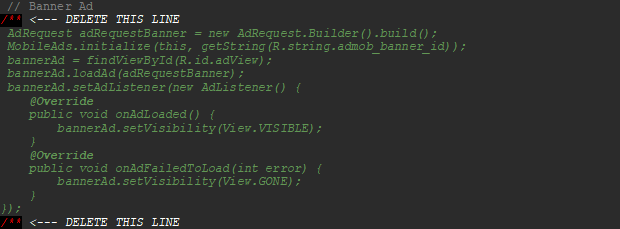
2. Delete lines from the screenshot below:

3. Add this line drawer.setDrawerLockMode(DrawerLayout.LOCK_MODE_LOCKED_CLOSED);
Your code should now look like this

1. Open MainActivity.java
2. Delete lines from the screenshot below:
3. Add this line drawer.setDrawerLockMode(DrawerLayout.LOCK_MODE_LOCKED_CLOSED);
Your code should now look like this
1. Download and install Android Studio.
https://developer.android.com/studio/
2. Export the project from zip, then import it into Android Studio.
3. Open strings.xml in folder app > res > values. Change the following:
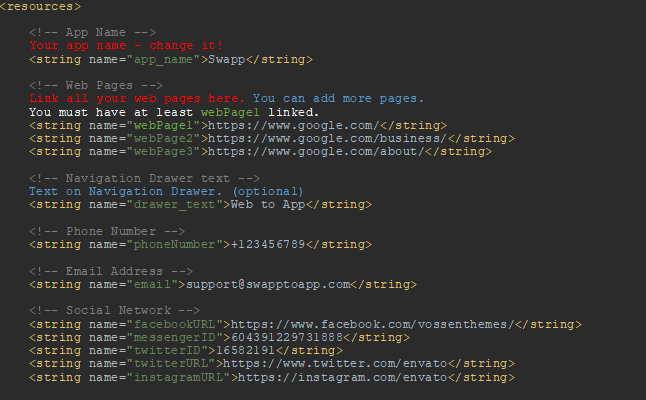
If you want to use offline pages, open offlinePage folder in app > assets.
Put your offline website in that folder, then link it like this (inside previously mentioned strings.xml):

1. Replace ic_launcher.png icon with your own.
You can find it in folder app > res > mipmap.
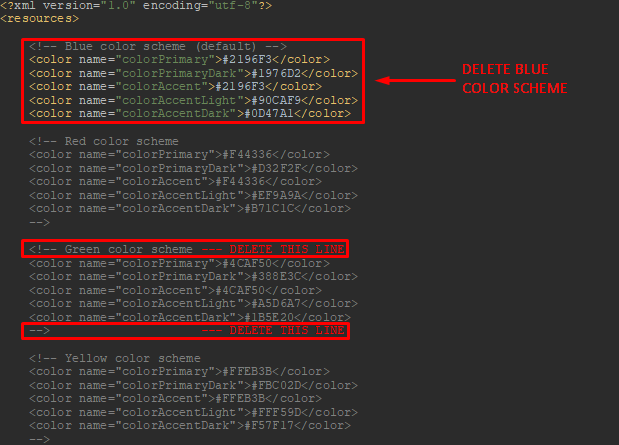
2. Choose a color you want to use in your app.
Open colors.xml in folder app > res > values.
There are 10 color schemes included, blue is the default one.
If you want to use blue color, don’t change anything and skip to next step.
If you want to use any other color scheme that is included,
delete (or comment) blue color scheme and uncomment
the color scheme you want to use.
For example, if you want to use green color scheme, do it this way:
3. Choose a font you want to use in your app.
Default font is Roboto, if you don’t want to change it skip this article.
a) If you want to use local (offline) font, put it in folder app > res > font.
b) If you want to use web (online) font, open webfont.xml in folder
app > res > font and change the following line to your liking.
In the given example, we are using web font Ubuntu with weight 500.

Once you are done, open styles.xml and styles.xml (v21) in folder
app > res > values > styles and link your font to these two lines below :

If you are using local (offline font), connect it same way:

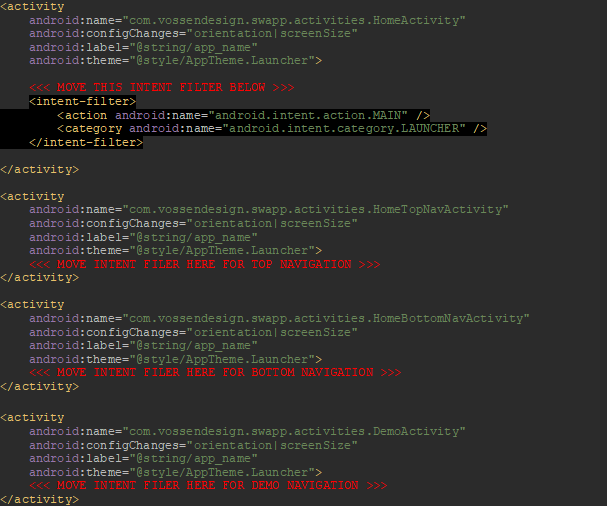
1. There are 3 home navigation styles included:
a) Home with Navigation Drawer (default)
b) Home with Top Tabs
c) Home with Bottom Tabs
and Demo Home version
If you want to use Home with Navigation Drawer, don’t change anything and skip to next step.
If you want to use Home with Top Tabs, Bottom Tabs or Demo Home, open manifest.xml in folder app > manifests and move intent filter to your home activity:
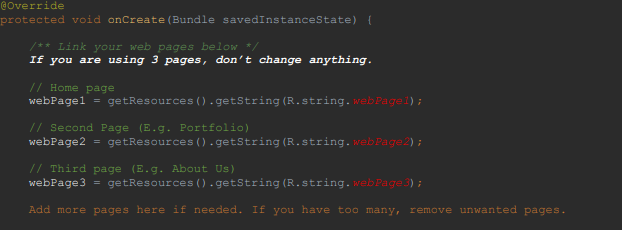
2. If you are using Home with Navigation Drawer, open
HomeActivity.java in folder app > java > com.vossenthemes.swapp > activities
and connect your web pages you have linked in your strings.xml.
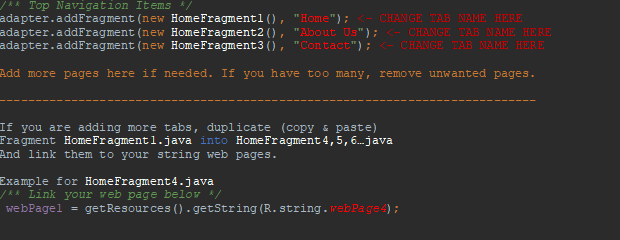
If you are using Home with Top Tabs or Bottom Tabs instead, open folder
app > java > com.vossenthemes.swapp > activities > fragments.
There are HomeFragment1, HomeFragment2 and HomeFragment3.
One HomeFragment is one webpage tab in Top Tab or Bottom Tab.
If you are using exacly 3 pages, skip this step.
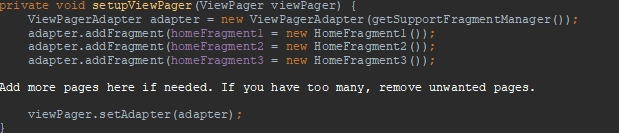
If you want more or less than 3 pages, open and change:
For Top Tabs: HomeTopNavActivity.java (folder java > activities)
For Bottom Tabs: HomeBotNavActivity.java (folder java > activities)

For Demo Home version: DemoActivity.java (folder java > activities)
]]>1. Changing Actionbar (Toolbar) menu
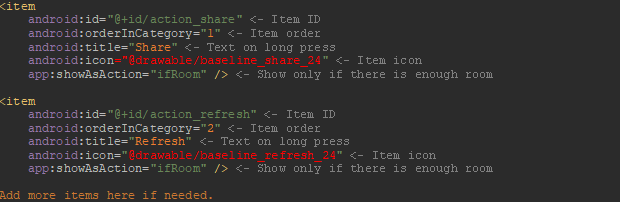
Open main.xml in folder app > res > menu.
Currently there are 2 items: share and refresh.
You can change them and add more items as well.
Once you have items to your liking, open your homepage file (HomeActivity, or HomeFragment1,2,3 for Home with Top Tabs / Home with Bottom Tabs) and find onOptionsItemSelected.
Here you can change your item funcions. Just make sure that main.xml and onOptionsItemSelected have the same number of items and same IDs.
If you want to add some different functions, go to HomeActivity and find onNavigationItemSelected. Select the action you want and copy&paste it into onOptionsItemSelected in your home activity.
2. Changing Home with Drawer or Home with Bottom Tabs menus
For Home with Navigation Drawer (drawer menu) and Home with Bottom Tabs (bottom menu), we use the same method as in step 1.
Home with Navigation Drawer:
Open activity_home_drawer.xml in folder app > res > menu.
Change it to your liking, then open HomeActivity.java and change onNavigationItemSelected to match your item actions.
Home with Bottom Tabs:
Open activity_homebottomdrawer.xml in folder app > res > menu.
Change it to your liking, then open HomeBottomNavActivity.java and change bottomNavigationView.setOnNavigationItemSelectedListener to match your item actions.
1. Create your AdMob account here:
Create new Interstitial and/or Banner Ads there.
2. Open strings.xml in folder app > res > values.
Place your App ID, Interstitial ID and/or Banner ID in their corresponding places.

-------------------------------------------------------------------------------------------------
WARNING: "You should always use test ads* when developing and testing your app--testing with live production ads is a violation of AdMob policy and could cause your account to be suspended"
*Current AdMob IDs inside project are for test ads. Use them to test ads before you change to live ad IDs.
-------------------------------------------------------------------------------------------------
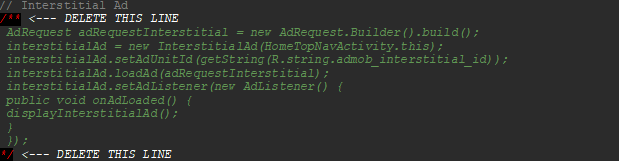
3. Open your home activity (Home with Drawer, Top or Bottom Tabs),
and uncomment ad type you want to use:
For Interstitial Ad:
For Banner Ad:
1. Go to Firebase and sign in with your Google account:
2. Click on CREATE NEW PROJECT
3. Enter your project name and click CREATE PROJECT
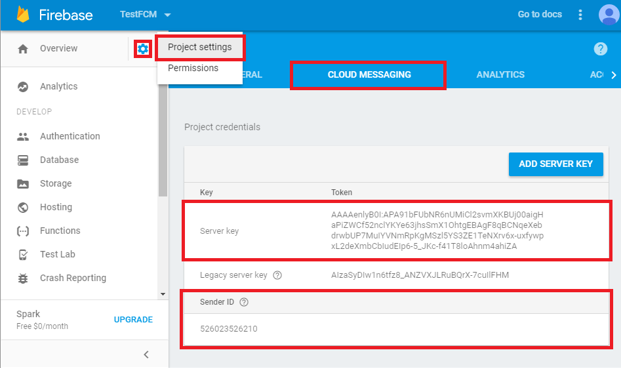
4. Click the Gear icon on the top left and select Project Settings.
5. Select the CLOUD MESSAGING tab.
6. Here you can see your Server Key and Sender ID. Save them.
7. Create your OneSignal account here:
https://www.onesignal.com/
8. Click ADD APP button.
9. After you have typed your app name, select Google Android.
10. Paste Firebase Server Key and Sender ID from step 6 to their corresponding places. Click SAVE.
11. On the next step, select Native Android and click NEXT.
12. You will be presented with your App ID. Save it.
13. Open Swapp in Android Studio, and go to file
build.gradle (Module: app) in folder Gradle Script.
14. Find onesignal_app_id and replace text
PUT YOUR ONESIGNAL APP ID HERE to your APP ID from step 12.

15. Click Sync Now in the top right corner.
16. Run your app on emulator or real device. Once the app is loaded, go back to your OneSignal setup page and click Check Subscribed Users.
If you see a green screen congratulating you, it means your setup is valid and you can continue. Click DONE to finish this setup.
17. On the right side, you will see SEND A PUSH MESSAGE. Here you will customize and send your messages.
]]>1. First you need to rename packages.
In your Project panel, click on the little gear icon.
2. Uncheck / De-select the Compact Empty Middle Packages option

3. Your package directory will now be broken up in individual directories.
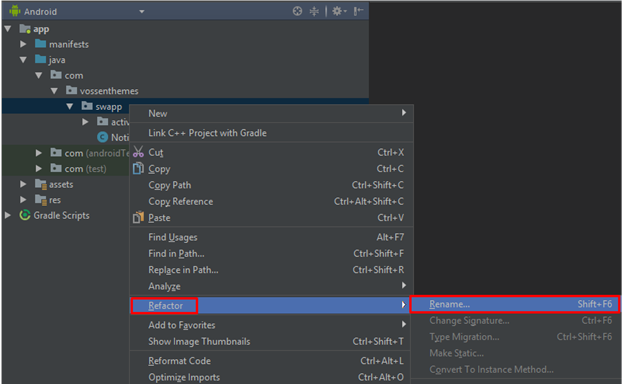
4. Individually select each directory you want to rename, and:
• Right-click it.
• Select Refactor.
• Click on Rename.
• In the pop-up dialog, click on Rename Package.
• Enter the new name and hit Refactor.
• Click Do Refactor in the bottom section.
• Allow a minute to let Android Studio update all changes.
5. Go to file build.gradle (Module: app) in folder Gradle Script.
Update the applicationId in the defaultConfig to your new Package name and click Sync Now in top right corner, if it hasn't already been updated automatically.

6. Open AndroidManifest.xml in app > manifests and change package= attribute if it hasn’t already been updated automatically.

7. Go to Build > Clean then Rebuild Project. Now you can set back Compacy Empty Middle Packages from step 1.
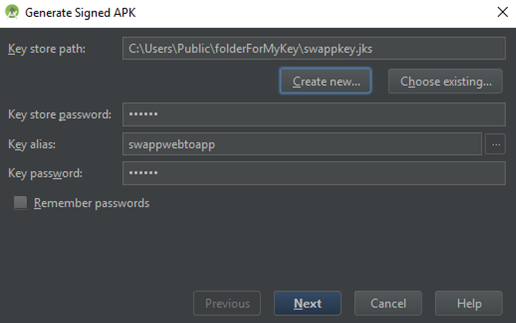
8. If everything is ready, you can publish your app.
Go to Build > Generate Signed APK… and fill in your details, select location for your key and write your key password.
9. Publish on Google Play Store.
]]>